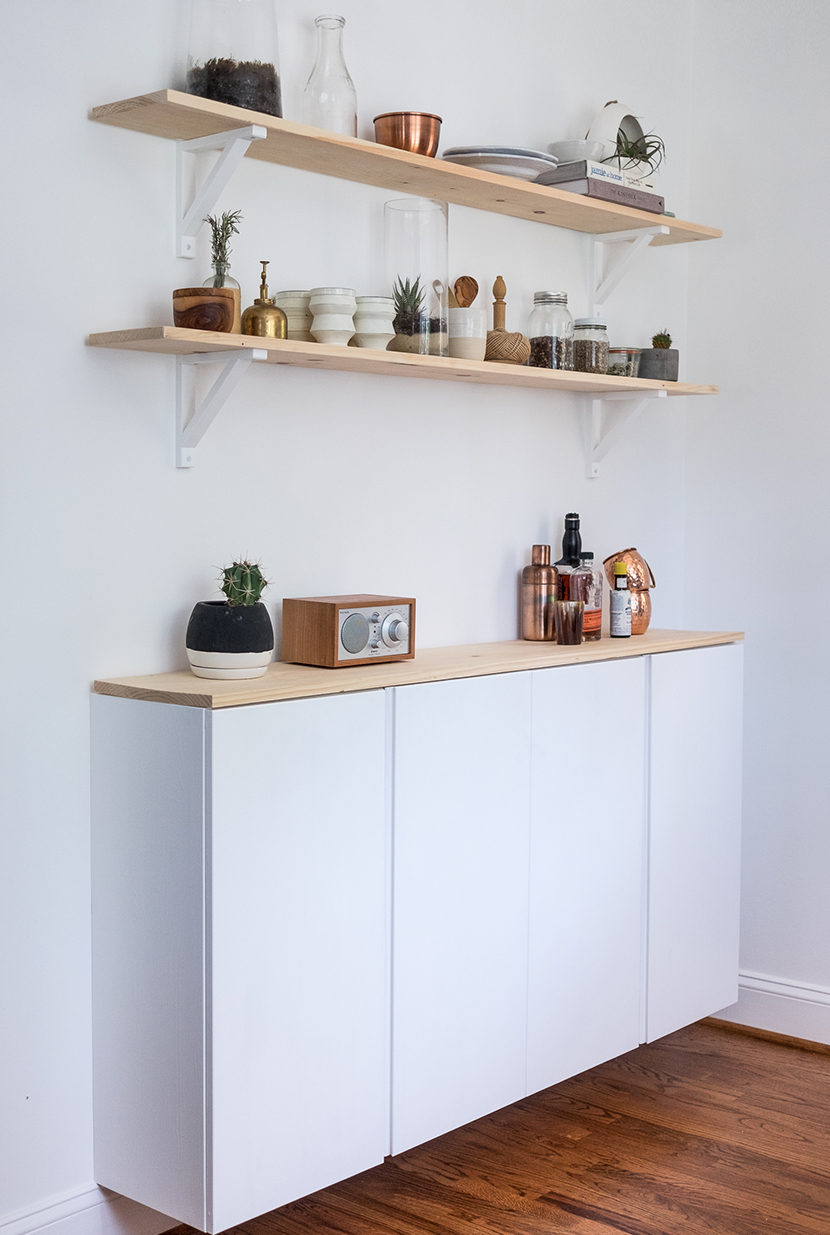
Easily convert the Ikea IVAR Cabinet into a beautiful floating modern cabinet to use in any space in your home. Use them to create additional storage options or even a desk with this simple DIY Ikea Hack.

From the day we purchased our home, we have been trying to figure out what to do with the blank wall in our kitchen. After a bit of dreaming, on our last trip to Ikea, we came up with the perfect solution. We are big fans of using Ikea pieces as a base for a project and then adding our touches, check out the piece we made for Hayes’s room. Maybe you have a wall like this in your home that is in the middle of a pathway, and there is only about a foot of space. If so, this may be the perfect solution for your space as well.

To make this yourself here is the full list of everything you will need: 2 IVAR unfinished cabinets, 4-6 Ekby Valter brackets, 2 shelf wood blocks, 1 Cabinet top block, 8+ wall mounting screws, a basic stud finder, wood filler, 150 grit sandpaper, and a drill.
Before you begin, make sure the wall you are looking to attach the cabinet & shelves too is strong enough to hold the weight of the cabinet & shelves. To easily find out where your mounting points are, save yourself a lot of time and damage, and get a basic stud finder. It will tell you what is wood and what is drywall. Believe me, this well be worth it. You want to be certain you are mounting the cabinet, and shelf brackets, to wood.
Once you have established where the studs are, you are going to want to mark and measure out where the cabinet will be mounted. Becuase I wanted this cabinet to be centered on the wall, I worked from the center out, but you may want to start from a different point. No matter where you start, it is important to mark and measure before drilling anything in.

I began by building the square frames of the cabinets and attaching them to the wall. There is a mounting board on the upper inside area of the square frame. Make sure you put at least 4 mounting screws into a stud. I also added an additional mounting board at the base to add additional support.

We wanted the cabinet to be painted white, and not stained, so I covered the corner screw holes with wood filler and used a 150 grit sandpaper to smooth the surface. It is not something you have to do, but I think it makes for a more finished look if the screw holes are covered and the cabinet feels built into the wall.
After attaching the cabinet base to the wall, I measured and mounted the shelf brackets. I left all of these raw wood pieces unpainted, and painted them on the wall, as they are all the same color, Behr Marquee Pure White Matte finish.

With all of the raw wood pieces mounted to the wall, I painted everything and let it set for a day before coming back to mount the doors and shelves. After the paint had dried it came together pretty quick. Just attach the painted doors onto the cabinet and insert the cabinet shelves at the desired height.

 The cabinet top and two shelves should be sealed with a waterproof sealant before they are mounted to the brackets and cabinet top. Once the wood sealer has dried, place the shelf wood and cabinet counter top in place and make sure everything is perfect before screwing them into place. If you need a water-resistant adhesive, silicone sealant is one such. Read this Professional Finish With Silicone Sealant post for some fixing equipment that can benefit from the use of a silicone sealant because of its chemical resistance and highly long-lasting quality.
All three pieces of wood should be under mounted with the screws vertically drilled into place. This will keep the clear look of fully hidden screws.


 That is it! I would love to hear how this DIY worked out for any of you.
To find a few items on the shelves:
Tivoli Radio
Kinfolk Table
Jamie at Home
Concrete Planter (similar)
Dipped White Jar
Twine Holder (similar)
Copper Bowls
Air Plant Holder (similar)
White Bowls
Black and White Planter
Gold Plant Sprayer
Angled Mugs
Moscow Mule Mugs
Copper Shaker
Cow Horn cup


